PhotoSwipeは、高性能な画像ギャラリーライブラリで、モバイルやデスクトップ、様々なブラウザで高いパフォーマンスと使い勝手を提供するライブラリである。当記事では、いくつかの主要な特徴と実装方法について解説する。
また検証環境だが、Vite×Vue3×TypeScriptで構築された環境にて動作環境を行っている。Vue.jsアプリケーション内で画像プレビューを実装する想定。実装方法については、公式ドキュメントに即した形で解説を行う。
実装方法
- ライブラリをインストールする。
npm i photoswipe --save- PhotoSwipeの型定義をインポートする
npm i --save @types/photoswipeちなみに、package.jsonの記述は以下の通り。
"dependencies": {
  "@types/photoswipe": "^4.1.2",
  "photoswipe": "^5.3.8",
}- 実装:コードの全体像
解説は各処理のコメントを参照のこと。
<template>
  <v-container>
    <!-- ユニークなIDを定義する -->
    <div id="photoSwipeGallery" class="pswp-gallery">
      <a
        v-for="image in images"
        :key="image.src"
        :href="image.src"
        :data-pswp-width="image.width"
        :data-pswp-height="image.height"
        target="_blank"
      >
        <img
          :src="image.src"
          alt=""
        />
      </a>
    </div>
  </v-container>
</template>

<script lang="ts">
import { defineComponent, onMounted, ref, type Ref, onUnmounted } from 'vue';
// photoswipeライブラリをインポートする
import PhotoSwipeLightbox from 'photoswipe/lightbox';
import 'photoswipe/style.css';

// imagesのデータの型
type ImageArrayType = {
  width: number | null
  height: number | null
  src: string
  href?: string | null
}

export default defineComponent({
  name: 'PhotoSwipePane',
  setup () {
    // lightboxの初期値をセット
    const lightbox = ref(null) as Ref<null | PhotoSwipeLightbox>

    // 画像データの配列
    const images: Array<ImageArrayType> = [
      {
        src: 'https://cdn.photoswipe.com/photoswipe-demo-images/photos/2/img-200.jpg',
        width: 1669,
        height: 2500
      },
      {
        src: 'https://cdn.photoswipe.com/photoswipe-demo-images/photos/7/img-200.jpg',
        width: 1875,
        height: 2500
      },
    ]

    // 初期描画の(DOMが生成された)タイミングでlightbox利用可能な状態に定義する
    onMounted(() => {
      if (!lightbox.value) {
        lightbox.value = new PhotoSwipeLightbox({
          gallery: '#photoSwipeGallery',
          children: 'a',
          pswpModule: () => import('photoswipe')
        });
        lightbox.value.init();
      }
    })

    // コンポーネントが破棄されるタイミングでlightboxを初期化する
    onUnmounted(() => {
      if (lightbox.value) {
        lightbox.value.destroy();
        lightbox.value = null;
      }
    })

    return {
      images,
    }
  },
})
</script>
注意事項
- 公式ドキュメントにも記載されているが、PhotoSwipeには画像のwidthとheightを指定する必要がある。
- 横幅はdata-pswp-width、高さはdata-pswp-height属性で指定する
- PhotoSwipeで推奨される最大サイズは 3000x3000px であり、それを超えるサイズを使用する場合には以下のプラグインを使用する。PhotoSwipeはレスポンシブの表示に最適化されたライブラリであるため、膨大な画像サイズのプレビューには不向きなライブラリである。
- PhotoSwipeで使用するaタグにhrefとdata-pswp-srcを指定した場合、data-pswp-srcが優先される。
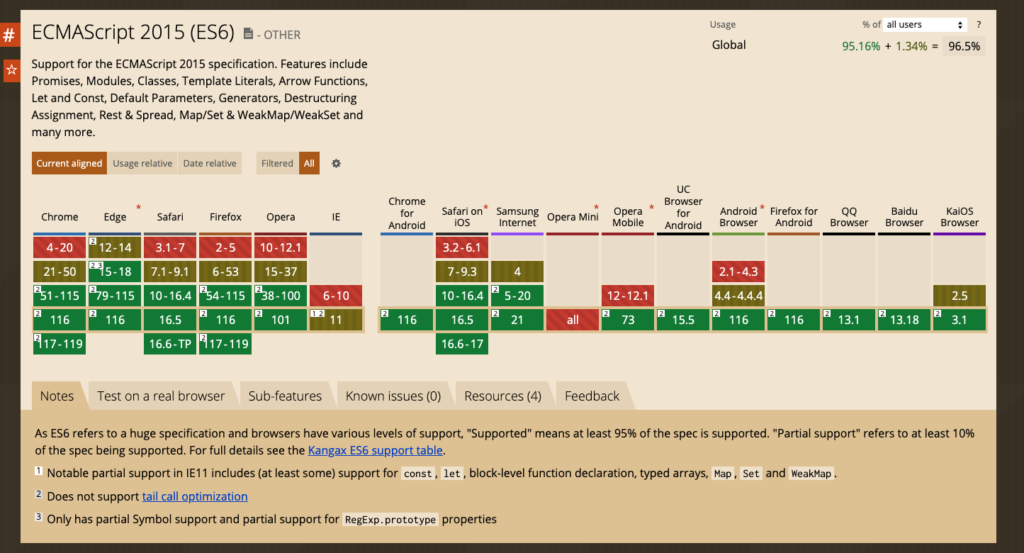
- ブラウザサポートについて
- PhotoSwipe は、ES6モジュールをサポートするすべてのブラウザで利用できる。
- 参照:https://caniuse.com/?search=ES6
その他のリソース
- 細かいオプションについては、以下を参照。
- イベントについては、以下を参照。
実践編1:画像サイズをJavaScriptで読み込んでからPhotoSwipeを起動する
この章では、実際のアプリ開発に近い実装方法を紹介する。通常のアプリケーション開発において、上記のように画像の絶対パスやサイズまで直書きで指定するケースはほとんどない。
以下のような流れで画像のアップロードそのため、画像のサイズの取得などはJavaScriptで実施し、その後や参照が行われるため、画像URLやサイズの取得は常に相対的になる。
- ユーザーがアプリクライアンどでスマホ、PCなどから画像をアップロードする
- ユーザーがアップロードした画像はAWSのS3などのストレージに保存される
- アップロードが成功したら、その情報(例えばS3のオブジェクトキーなど)をデータベースに保存
- ユーザーがアプリクライアントから画像参照をリクエストする
- ユーザーが参照したい画像に関する情報(S3のオブジェクトキーなど)をデータベースから取得する
- ストレージ(S3)のオブジェクトキーを基に、(ストレージ)S3上の画像へのURLを生成する
- フロントエンドで生成されたURLを用いて、画像を表示する
そのため、画像のサイズの取得などはJavaScriptで実施し、その後そのため、画像のサイズの取得などはJavaScriptで実施し、その後PhotoSwipeなどのライブラリを発火させる必要がある。以下にてその実装法を提供する。(`loadImageDimensions`などを参照)
<template>
  <v-container>
    <!-- ユニークなIDを定義する -->
    <div id="photoSwipeGallery" class="pswp-gallery">
      <a
        v-for="image in images"
        :key="image.src"
        :href="image.src"
        :data-pswp-width="image.width"
        :data-pswp-height="image.height"
        target="_blank"
      >
        <img
          :src="image.src"
          width="200"
          alt=""
        />
      </a>
    </div>
  </v-container>
</template>

<script lang="ts">
import { defineComponent, onMounted, ref, type Ref, onUnmounted } from 'vue';
// photoswipeライブラリをインポートする
import PhotoSwipeLightbox from 'photoswipe/lightbox';
import 'photoswipe/style.css';

// imagesのデータの型
type ImageArrayType = {
  width: number | null
  height: number | null
  src: string
  href?: string | null
}

export default defineComponent({
  name: 'PhotoSwipePane',
  setup () {
    // lightboxの初期値をセット
    const lightbox = ref(null) as Ref<null | PhotoSwipeLightbox>

    // 画像データの配列
    const images: Ref<Array<ImageArrayType>> = ref([
      {
        src: 'https://cdn.pixabay.com/photo/2023/08/05/23/40/bird-8171927_1280.jpg',
        width: null,
        height: null
      },
      {
        src: 'https://cdn.pixabay.com/photo/2023/05/02/21/08/river-7966163_1280.png',
        width: null,
        height: null
      },
    ])

    /**
     * 画像のwidthとheightを取得する処理
     * @param image 画像データ
     */
    const loadImageDimensions = (image: ImageArrayType) => {
      return new Promise<void>((resolve, reject) => {
        const img = new Image();
        img.onload = () => {
          image.width = img.width;
          image.height = img.height;
          resolve();
        };
        img.onerror = reject;
        img.src = image.src;
      });
    };

    /**
     * 初期描画の(DOMが生成された)タイミングでlightbox利用可能な状態に定義する
     */
    onMounted(async () => {
      // 画像サイズを取得するPromiseを実行し、終了を待機する
      const promises = images.value.map(loadImageDimensions);
      try {
        await Promise.all(promises);
      } catch (error) {
        console.error('An error occurred while loading the images:', error);
      }
      // lightboxを生成する
      if (!lightbox.value) {
        lightbox.value = new PhotoSwipeLightbox({
          gallery: '#photoSwipeGallery',
          children: 'a',
          pswpModule: () => import('photoswipe')
        });
        lightbox.value.init();
      }
    })

    // コンポーネントが破棄されるタイミングでlightboxを初期化する
    onUnmounted(() => {
      if (lightbox.value) {
        lightbox.value.destroy();
        lightbox.value = null;
      }
    })

    return {
      images,
    }
  },
})
</script>
実践編2 画像キャプションを表示させる(作成中)
公式ドキュメントにも記載があるが、画像プレビューの際に任意の文字列をキャプションとして表示させることもできる。
https://photoswipe.com/caption/
今回はプラグイン(photoswipe-dynamic-caption-plugin)を使ってキャプション付き画像プレビューを実装する。
https://github.com/dimsemenov/photoswipe-dynamic-caption-plugin
コードの全体像は以下となる。上記「実践編1:画像サイズをJavaScriptで読み込んでからPhotoSwipeを起動する」の差分については下記にて解説する。
<template>
  <v-container>
    <!-- ユニークなIDを定義する -->
    <div

      id="photoSwipeGallery"
      class="pswp-gallery"
    >
      <a
        v-for="image in images"
        :key="image.src"
        :href="image.src"
        :data-pswp-width="image.width"
        :data-pswp-height="image.height"
        target="_blank"
        class="pswp-gallery__item"
      >
        <img
          :src="image.src"
          width="200"
          alt=""
        />
        <div class="pswp-caption-content">
          <b>Long caption</b><br>Lorem ipsum dolor sit amet, consectetur adipiscing elit, sed do eiusmod tempor incididunt ut labore et dolore magna aliqua. Ut enim ad minim veniam, quis nostrud exercitation ullamco laboris nisi ut aliquip ex ea commodo consequat. Duis aute irure dolor in reprehenderit in voluptate velit esse cillum dolore eu fugiat nulla pariatur. Excepteur sint occaecat cupidatat non proident, sunt in culpa qui officia deserunt mollit anim id est laborum<br>Lorem Ipsum
        </div>
      </a>
    </div>
  </v-container>
</template>

<script lang="ts">
import { defineComponent, onMounted, ref, type Ref, onUnmounted } from 'vue';
// photoswipeライブラリをインポートする
import PhotoSwipeLightbox from 'photoswipe/lightbox';
import 'photoswipe/style.css';
// photoswipe-dynamic-caption-pluginをインポート
import PhotoSwipeDynamicCaption from 'photoswipe-dynamic-caption-plugin';
import 'photoswipe-dynamic-caption-plugin/photoswipe-dynamic-caption-plugin.css'


/**
 * imagesのデータの型
 */
type ImageArrayType = {
  width: number | null
  height: number | null
  src: string
  href?: string | null
}

/**
 * キャプション表示で使用する型
 */
const smallScreenPadding = {
  top: 0, bottom: 0, left: 0, right: 0
};
const largeScreenPadding = {
  top: 30, bottom: 30, left: 0, right: 0
};

export default defineComponent({
  name: 'PhotoSwipePane',
  setup () {
    // lightboxの初期値をセット
    const lightbox = ref(null) as Ref<null | PhotoSwipeLightbox>

    // 画像データの配列
    const images: Ref<Array<ImageArrayType>> = ref([
      {
        src: 'https://cdn.pixabay.com/photo/2023/08/05/23/40/bird-8171927_1280.jpg',
        width: null,
        height: null
      },
      {
        src: 'https://cdn.pixabay.com/photo/2023/05/02/21/08/river-7966163_1280.png',
        width: null,
        height: null
      },
    ])

    /**
     * 画像のwidthとheightを取得する処理
     * @param image 画像データ
     */
    const loadImageDimensions = (image: ImageArrayType) => {
      return new Promise<void>((resolve, reject) => {
        const img = new Image();
        img.onload = () => {
          image.width = img.width;
          image.height = img.height;
          resolve();
        };
        img.onerror = reject;
        img.src = image.src;
      });
    };

    /**
     * 初期描画の(DOMが生成された)タイミングでlightbox利用可能な状態に定義する
     */
    onMounted(async () => {
      // 画像サイズを取得するPromiseを実行し、終了を待機する
      const promises = images.value.map(loadImageDimensions);
      try {
        await Promise.all(promises);
      } catch (error) {
        console.error('An error occurred while loading the images:', error);
      }
      // lightboxを生成する
      if (!lightbox.value) {
        lightbox.value = new PhotoSwipeLightbox({
          gallerySelector: '#photoSwipeGallery',
          childSelector: 'a',
          paddingFn: (viewportSize) => {
            return viewportSize.x < 700 ? smallScreenPadding : largeScreenPadding
          },
          pswpModule: () => import('photoswipe')
        });
        new PhotoSwipeDynamicCaption(lightbox.value, {
          // Plugins options, for example:
          mobileLayoutBreakpoint: 700,
          type: 'auto',
          mobileCaptionOverlapRatio: 1
        });
        lightbox.value.init();
      }
    })

    // コンポーネントが破棄されるタイミングでlightboxを初期化する
    onUnmounted(() => {
      if (lightbox.value) {
        lightbox.value.destroy();
        lightbox.value = null;
      }
    })

    return {
      images,
    }
  },
})
</script>
HTML部分は以下の変更を行った。
- CSS調整のために、v-for のループ対象を<div>にスライド
- 同様の要素に
class="pswp-gallery__item"を追加
- 同様の要素に
div class="pswp-caption-content"の要素を追加(キャプション表示に使用する)
<div
  id="photoSwipeGallery"
  class="pswp-gallery"
  >
  <a
    v-for="image in images"
    :key="image.src"
    :href="image.src"
    :data-pswp-width="image.width"
    :data-pswp-height="image.height"
    target="_blank"
    class="pswp-gallery__item"
  >
    <img
      :src="image.src"
      width="200"
      alt=""
    />
    <div class="pswp-caption-content">
      <b>Long caption</b><br>Lorem ipsum dolor sit amet, consectetur adipiscing elit, sed do eiusmod tempor incididunt ut labore et dolore magna aliqua. Ut enim ad minim veniam, quis nostrud exercitation ullamco laboris nisi ut aliquip ex ea commodo consequat. Duis aute irure dolor in reprehenderit in voluptate velit esse cillum dolore eu fugiat nulla pariatur. Excepteur sint occaecat cupidatat non proident, sunt in culpa qui officia deserunt mollit anim id est laborum<br>Lorem Ipsum
    </div>
  </a>
</div>
JSのロジックについては、以下の変更を行った
// photoswipe-dynamic-caption-pluginをインポート
import PhotoSwipeDynamicCaption from 'photoswipe-dynamic-caption-plugin';
import 'photoswipe-dynamic-caption-plugin/photoswipe-dynamic-caption-plugin.css'

/**
 * キャプション表示で使用する型
 */
const smallScreenPadding = {
  top: 0, bottom: 0, left: 0, right: 0
};
const largeScreenPadding = {
  top: 30, bottom: 30, left: 0, right: 0
};
setup関数内部
new PhotoSwipeLightboxの以下のプロパティ名を変更した- gallery => gallerySelector
- children => childSelector
new PhotoSwipeLightboxにpaddingFnを追加(キャプション表示のための余白)- lightboxを作成後、
new PhotoSwipeDynamicCaptionを実行し、photoswipe-dynamic-caption-pluginのインスタンスを生成する。
/**
 * 初期描画の(DOMが生成された)タイミングでlightbox利用可能な状態に定義する
 */
onMounted(async () => {
  // 省略...
  // lightboxを生成する
  if (!lightbox.value) {
    lightbox.value = new PhotoSwipeLightbox({
      gallerySelector: '#photoSwipeGallery',
      childSelector: 'a',
      paddingFn: (viewportSize) => {
        return viewportSize.x < 700 ? smallScreenPadding : largeScreenPadding
      },
      pswpModule: () => import('photoswipe')
    });
    new PhotoSwipeDynamicCaption(lightbox.value, {
      // Plugins options, for example:
      mobileLayoutBreakpoint: 700,
      type: 'auto',
      mobileCaptionOverlapRatio: 1
    });
    lightbox.value.init();
  }
})
以上。


コメント