今回の記事では、画像にhoverした際に、拡大プレビューを表示する機能を実装していきます。
ECサイトの商品ページなどで、よく見られる機能です。
※紹介する実装方法は、素のJavaScriptで実装しており、ライブラリは使用していません。
あくまで、機能の内部的な仕組みを学びたい方向けの記事になっています。
■ 関連記事 : JavaScriptの基礎習得に役立つ技術書【おすすめ3選】
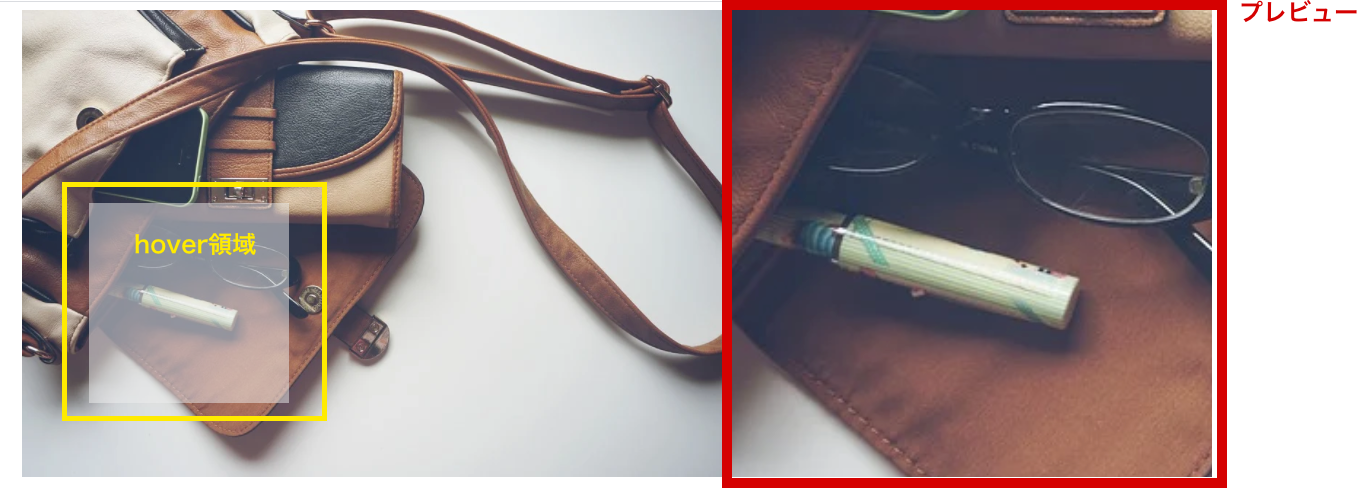
まずは完成イメージを確認ください。
黄色枠内が商品画像にhoverした際に拡大対象になる領域で、赤枠内がプレビューの表示領域になります。

動作
実装
実際の動作を確認いただいたところで、実装方法を解説していきます。
ソースコードの全体像
こちらはいつも通り、結論から知りたい方のためにコードから公開します。
コピペで動作しますので、ご自身の環境でお試しください。
HTML
<div class="container">
    <div class="product_image">
        <img src="https://cdn.pixabay.com/photo/2016/06/25/12/50/handbag-1478814_960_720.jpg" alt="商品画像">
        <div class="zoom_area"></div>
    </div>
    <div class="product_info">
        <div class="previewer"><img src="https://cdn.pixabay.com/photo/2016/06/25/12/50/handbag-1478814_960_720.jpg" alt="商品画像"></div>
        <div class="product_info_inner"></div>
    </div>
</div>
CSS
img {
    width: 100%;
    vertical-align: bottom;
}
.container {
    max-width: 1200px;
    display: flex;
    margin: 0 auto;
}
.container > div {
    position: relative;
    padding: 0 10px;
    box-sizing: border-box;
}
.product_image {
    width: 60%;
    overflow: hidden;
}
.product_info {
    width: 40%;
}
.product_info_inner {
    background: #eee;
    height: 100%;
}
.previewer {
    display: none;
    position: absolute;
    right: 0;
    top: 0;
    left: 0;
    bottom: 0;
    overflow: hidden;
}
.previewer.active {
    display: block;
}

/* zoom_area */
.zoom_area {
    width: 200px;
    height: 200px;
    background: rgba(238, 238, 238, 0.5);
    position: absolute;
    display: none;
}
.zoom_area.active {
    display: block;
}
JavaScript
const product_image_wrap = document.querySelector('.product_image');
const product_image_element = document.querySelector('.product_image img');
const previewer = document.querySelector('.previewer');
const previewer_img = document.querySelector('.previewer img');
const zoom_area = document.querySelector('.zoom_area');

let size = 200;
let scale = 2.5;
let limit_x, limit_y;

/* プレビュー画像をset */
product_image_element.addEventListener('load', function() {
    previewer_img.setAttribute('src', product_image_element.src);
    previewer_img.style.width = (product_image_element.offsetWidth * scale) + 'px';
    limit_x = product_image_element.offsetWidth - size;
    limit_y = product_image_element.offsetHeight - size;
});

// 商品画像へのhover
product_image_wrap.addEventListener('mouseenter', function(e) {
    previewer.classList.add('active');
    zoom_area.classList.add('active');
});

// mousemoveイベント
product_image_wrap.addEventListener('mousemove', function(e) {

    const rect_obj = product_image_wrap.getBoundingClientRect();

    const offset_x = e.pageX - rect_obj.left;
    const offset_y = e.pageY - rect_obj.top;

    let left_position = offset_x - (size / 2);
    let top_position = offset_y - (size / 2);

    left_position > limit_x ? left_position = limit_x + 10 : left_position < 0 ? left_position = 0 + 10 : false;
    top_position > limit_y ? top_position = limit_y : top_position < 0 ? top_position = 0 : false;


    zoom_area.style.top = top_position + 'px';
    zoom_area.style.left = left_position + 'px';

    previewer_img.style.marginLeft = -(left_position * scale) + 'px';
    previewer_img.style.marginTop = -(top_position * scale) + 'px';

});

// mouseleave
product_image_wrap.addEventListener('mouseleave', function() {
    previewer.classList.remove('active');
    zoom_area.classList.remove('active');
})
■ 関連記事 : JavaScriptの基礎習得に役立つ技術書【おすすめ3選】
解説 : JavaScript
JSにフォーカスして解説を行います
処理順
- 処理に使う共通の要素や数値を、定数 or 変数で定義する
- 商品画像のsrcを、プレビュー用画像のsrcにsetする
- 商品画像にhoverした時に、hover領域とpreview領域を表示させる
- 商品画像上でmousemoveした際に、マウス座標を取得し要素のposition値に割り当てる
- 商品画像からhoverが外れた時に、hover領域とpreview領域を非表示にする
1. 処理に使う共通の要素や数値を、定数 or 変数で定義する
const product_image_wrap = document.querySelector('.product_image');
const product_image_element = document.querySelector('.product_image img');
const previewer = document.querySelector('.previewer');
const previewer_img = document.querySelector('.previewer img');
const zoom_area = document.querySelector('.zoom_area');

let size = 200;
let scale = 2.5;
let limit_x, limit_y;
DOM操作に必要な要素を定数化します。
また、今回は拡大機能を実装するので、拡大用の比率(scale)も変数定義しておきます。
sizeは、商品画像にhoverした際に表示されるhover領域のサイズです。
2. 商品画像のsrcを、プレビュー用画像のsrcにsetする
product_image_element.addEventListener('load', function() {
    previewer_img.setAttribute('src', product_image_element.src);
    previewer_img.style.width = (product_image_element.offsetWidth * scale) + 'px';
    limit_x = product_image_element.offsetWidth - size;
    limit_y = product_image_element.offsetHeight - size;
});
商品画像の読み込みが完了したタイミングで、preview要素のimg属性にsrcをsetします。
同時にpreview用の画像のサイズも指定します。
1.の変数定義で、scale(比率)を2.5倍に設定しているので、preview用の画像のサイズは、2.5倍になります。
3. 商品画像のhover時に、hover領域とpreview領域を表示させる
product_image_wrap.addEventListener('mouseenter', function(e) {
    previewer.classList.add('active');
    zoom_area.classList.add('active');
});
このフローは基本的なDOM操作です。
商品画像領域にマウスがhoverした際に、プレビュー要素とhover領域を表示させます。
イベントについては、mouseoverとmouseenterの2つの似たイベントがありますが、
mouseoverは子要素にイベントが伝搬する特性があるので、今回はmouseenterを採用しました。
4. 商品画像上でmousemoveした際に、マウス座標を要素のposition値に割り当てる
product_image_wrap.addEventListener('mousemove', function(e) {

    const rect_obj = product_image_wrap.getBoundingClientRect();

    const offset_x = e.pageX - rect_obj.left;
    const offset_y = e.pageY - rect_obj.top;

    let left_position = offset_x - (size / 2);
    let top_position = offset_y - (size / 2);

    left_position > limit_x ? left_position = limit_x + 10 : left_position < 0 ? left_position = 0 + 10 : false;
    top_position > limit_y ? top_position = limit_y : top_position < 0 ? top_position = 0 : false;


    zoom_area.style.top = top_position + 'px';
    zoom_area.style.left = left_position + 'px';

    previewer_img.style.marginLeft = -(left_position * scale) + 'px';
    previewer_img.style.marginTop = -(top_position * scale) + 'px';

});
ここのフローが今回の機能のコアになります。
まずイベントは、mousemoveイベントを使用し、商品画像上でマウスが動くたびにマウス座標を取得します。
const rect_obj = product_image_wrap.getBoundingClientRect();
const offset_x = e.pageX - rect_obj.left;
const offset_y = e.pageY - rect_obj.top;
上記の記述では、
・rect_obj変数に、ブラウザ全体を基準にした商品画像要素の座標位置を格納します。
・e.pageX、e.pageYのドキュメント全体を基準にしたイベントの座標から、rect_objのtop, leftの値を引くことで、
正確なマウス座標の位置を取得します。
hover領域の位置を制御
let left_position = offset_x - (size / 2);
let top_position = offset_y - (size / 2);
上記の記述では、hover領域の要素の位置を指定しています。
offset_x – (size / 2) offset_y – (size / 2)とすることで、
マウスがhover領域の中心に配置されるようにしています。
hover領域の動作範囲を制御
left_position > limit_x ? left_position = limit_x + 10 : left_position < 0 ? left_position = 0 + 10 : false;
top_position > limit_y ? top_position = limit_y : top_position < 0 ? top_position = 0 : false;
上記の記述では、hover領域が画像枠内からはみ出ないように、
X,Y座標が0以下になった場合は、positionの絶対値に0を指定するようにしています。
preview領域の画像の位置を制御
previewer_img.style.marginLeft = -(left_position * scale) + 'px';
previewer_img.style.marginTop = -(top_position * scale) + 'px';
上記の記述では、preview領域の画像の位置を制御しています。
preview領域の画像サイズは2.5倍に設定されているので、marginLeftとmarginTopの値も2.5倍にしています。
5. 商品画像からhoverが外れた時に、拡大対象のhover要素と拡大preview領域を非表示にする
product_image_wrap.addEventListener('mouseleave', function() {
    previewer.classList.remove('active');
    zoom_area.classList.remove('active');
})
3.の処理の対照のDOM操作で、商品画像領域からhoverが外れたらプレビュー機能をOFFにします。
処理は以上になります。