
Nuxt3とTypeScriptを使用したプロジェクトにJestを導入し、GitHub Actionsでテストを自動化する手順を解説する。この記事では、Jestのインストールから設定、テストの作成と実行、そしてCI/CDパイプラインに組み込む方法までを詳しく説明する。テストカバレッジレポートの確認方法も紹介するので、プロジェクトの品質向上に役立ててほしい。
実行環境
- Nuxt 3
- TypeScript
Jestインストール
公式: https://jestjs.io/ja/docs/getting-started#typescript-を使用する
まず、Jestをインストールする。
$ npm install --save-dev jest次に、ts-jestをインストールして、TypeScriptを使えるようにする。
npm install --save-dev ts-jest※Jestが、TypeScriptをトランスパイルするために必要な設定ファイル(jest.config.ts)が必要だが、後で解説する。
また、JestのグローバルAPIを使うために、@jest/globalsパッケージもインストールする。
npm install --save-dev @jest/globalsこれで必要なパッケージのインストールは完了。
スクリプトを追加する
次に、package.jsonにJestを実行するためのスクリプトを追加する。
{
  "scripts": {
    "build": "nuxt build",
    "dev": "nuxt dev",
    "test": "jest --coverage" // ←追加
  },
}
これにより、npm testコマンドでJestを実行できるようになる。
jest.config.tsの作成
プロジェクトのルートにjest.config.tsを作成し、Jestの実行に必要な設定を書いていく。
私のプロジェクトには、PlaywrightのE2Eテストも含まれているため、testPathIgnorePatternsでE2Eテスト対象のファイルをJestの実行から除外している。
詳細は、コードのコメントを参照。
import type { Config } from "jest";

const config: Config = {
  collectCoverage: true,
  // カバレッジレポートの形式を指定する。
  // textはコンソールに出力し、lcovはHTML形式でレポートを生成
  coverageReporters: ["text", "lcov"],
  // カバレッジレポートを出力するディレクトリを指定
  coverageDirectory: "./coverage",
  // 特定のファイルを除外
  testPathIgnorePatterns: [
    "/node_modules/",
    "/tests/e2e/", // PlaywrightのE2Eテストがあるディレクトリを除外
  ],
  // transform設定は、Jestがテスト対象のファイルを実行する前に、
  // 特定の種類のファイルをどのように変換(トランスパイル)するかを指定するもの
  transform: {
    "^.+\\.ts$": "ts-jest", // .tsファイル(TypeScriptファイル)をトランスパイルするための設定
    "^.+\\.js$": "babel-jest", // .jsファイル(JavaScriptファイル)をトランスパイルするための設定
  },
  moduleNameMapper: {
    // スタイルファイルを無視
    "\\.(css|less|scss|sass)$": "identity-obj-proxy",
    // エイリアスを解決
    // 「~」「@」がプロジェクトのルートディレクトリを指すように設定
    "^~/(.*)$": "<rootDir>/$1",
    "^@/(.*)$": "<rootDir>/$1",
  },
};

module.exports = config;
tsconfig.jsonの設定
verbatimModuleSyntaxオプションを追記する。
{
  "extends": "./.nuxt/tsconfig.json",
  "compilerOptions": {
    "esModuleInterop": true,
    // 追記
    "verbatimModuleSyntax": false
    // その他のオプション...
  }
}
verbatimModuleSyntaxオプションは、TypeScriptのコンパイル時にESM(ECMAScript Modules)構文をそのまま保持するかどうかを制御する。ここでは、falseを指定しているため、TypeScriptは、モジュール構文を適切なモジュールシステム(CommonJSやAMDなど)に変換する。
テストの作成と実行
テスト関数
Nuxt3でComposable関数をテストする想定で、composables/useJest.tsを作成する。
export function useJest() {
  const message = "Hello, Jest with Nuxt 3!";

  const getMessage = () => {
    return message;
  };

  return {
    getMessage,
  };
}
次に、上記の関数をテストするために、tests/unit/useJest.spec.tsにテストを作成する。
import { describe, expect, test } from "@jest/globals";
import { useJest } from "~/composables/useJest";

describe("useJest Composable", () => {
  test("should return the correct message", () => {
    const { getMessage } = useJest();
    expect(getMessage()).toBe("Hello, Jest with Nuxt 3!");
  });
});
テストを実行する。
$ npm test実行結果は以下の通り。
> test
> jest --coverage

Determining test suites to run
 PASS  tests/unit/useJest.spec.ts
  useJest Composable
    ✓ should return the correct message (1 ms)

-|---------|----------|---------|---------|-------------------
 | % Stmts | % Branch | % Funcs | % Lines | Uncovered Line #s
-|---------|----------|---------|---------|-------------------
 |     100 |      100 |     100 |     100 |
  |     100 |      100 |     100 |     100 |
-|---------|----------|---------|---------|-------------------
Test Suites: 1 passed, 1 total
Tests:       1 passed, 1 total
Snapshots:   0 total
Time:        1.456 s
テストが成功していることがわかる。
失敗した場合のテストも行ってみる。tests/unit/useJest.spec.tsに以下を追記する。
// 失敗するテスト
test("Failed correct message", () => {
  const { getMessage } = useJest();
  expect(getMessage()).toBe("Hello, Jest with Next.js!");
});
もう一度、テストを実行する。
$ npm test実行結果は以下の通り。
> test
> jest --coverage

Determining test suites to run
 FAIL  tests/unit/useJest.spec.ts
  useJest Composable
    ✓ should return the correct message (1 ms)
    ✕ Failed correct message (2 ms)

  ● useJest Composable › Failed correct message

    expect(received).toBe(expected) // Object.is equality

    Expected: "Hello, Jest with Next.js!"
    Received: "Hello, Jest with Nuxt 3!"

      10 |   test("Failed correct message", () => {
      11 |     const { getMessage } = useJest();
    > 12 |     expect(getMessage()).toBe("Hello, Jest with Next.js!");
         |                          ^
      13 |   });
      14 | });
      15 |

      at Object.<anonymous> (tests/unit/useJest.spec.ts:12:26)

-|---------|----------|---------|---------|-------------------
 | % Stmts | % Branch | % Funcs | % Lines | Uncovered Line #s
-|---------|----------|---------|---------|-------------------
 |     100 |      100 |     100 |     100 |
  |     100 |      100 |     100 |     100 |
-|---------|----------|---------|---------|-------------------
Test Suites: 1 failed, 1 total
Tests:       1 failed, 1 passed, 2 total
Snapshots:   0 total
Time:        2.626 s
1つのテストが成功し、もう1つが失敗していることがわかる。
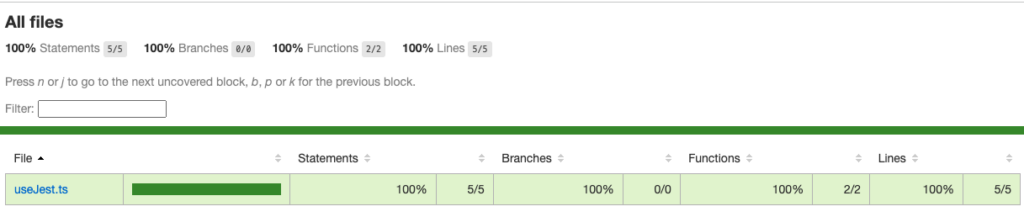
カバレッジレポートを確認する
テストが完了すると、プロジェクトのルートディレクトリにあるcoverageフォルダにカバレッジレポートが生成される。coverage/lcov-report/index.htmlというHTMLファイルが生成されるので、このファイルをブラウザで開くことで、テストカバレッジの詳細なレポートを確認できる。
CIで実行する
JestをCIで実行し、GitHub Actionsでカバレッジを確認する方法を紹介する。まず、.github/workflows/ci.ymlを作成し、以下の内容を実装する。
name: CI

on:
  push:
    branches:
      - main
  pull_request:
    branches:
      - main

jobs:
  test:
    runs-on: ubuntu-latest

    steps:
      - name: Checkout code
        uses: actions/checkout@v4

      - name: Setup Node.js
        uses: actions/setup-node@v4
        with:
          node-version: "18"

      - name: Install dependencies
        run: npm install

      # Jestのテストとカバレッジ計測を行う
      # coverageディレクトリにカバレッジレポートが出力される
      - name: Run tests with coverage
        run: npm test -- --coverage

      - name: Upload coverage report
        uses: actions/upload-artifact@v4
        with:
          name: coverage-report
          path: ./coverage/lcov-report
          retention-days: 7 # オプション: アーティファクトの保持期間を設定
対象ブランチ(main)にプルリクエストをマージし、CIでテストを実行する。
CIでのテストが成功していることがわかる。
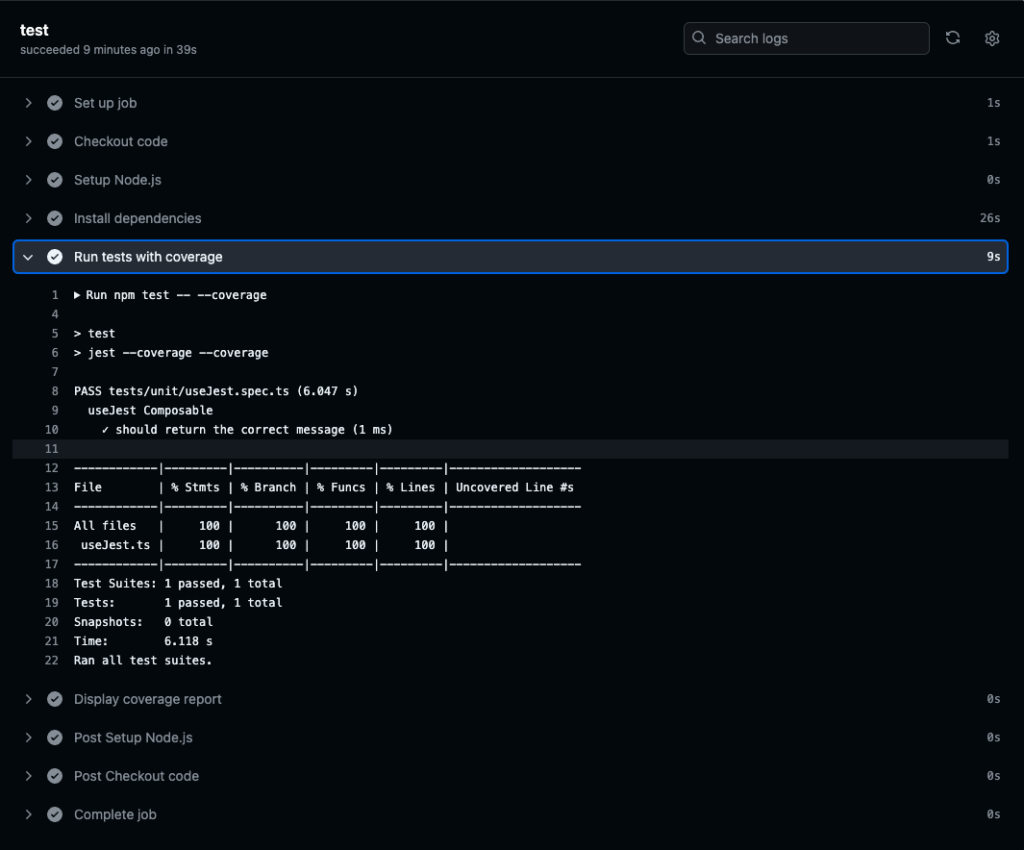
「Upload coverage report」のプロセスで、カバレッジレポートをアーティファクトとしてダウンロードできるように設定している。ファイルをダウンロードすることで、レポートを確認できる。
まとめ
Nuxt 3とTypeScriptを使用したプロジェクトにJestを導入し、テストを自動化する手順を解説した。Jestのインストールから設定、テストの作成と実行、そしてCI/CDパイプラインへの組み込みまで、一連の流れを理解して実践することで、プロジェクトの品質を効果的に向上させることができる。

コメント